#Yarn Tutorial
Explore tagged Tumblr posts
Visit Tumblr Blog
Explore Tumblr blogs with no restrictions, modern design and the best experience.
Last Seen Tumblr Blogs


Fun Fact
Tumblr has a 66 index score for customer satisfaction in the US.
Text
Hooking rugs that look like dogs
Here's how I do it:
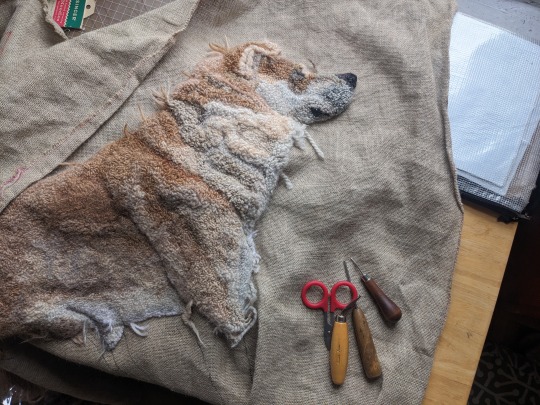
The process I use is called rug hooking (not latch hook or punch needle or tufting, though it is the forerunner of the latter two techniques). Rugs are hooked by pulling loops of fabric strips or yarn through the holes of a base fabric with a coarse open weave, like burlap, or linen, or rug warp. The loops are pulled through the fabric with a squat-handled hook whose business end is shaped like a crochet hook. There are no knots and the loops aren't sewed down in any way. The whole thing stays put just by the tension of all those loops packed together in the weave of the foundation fabric.
This isn't a true detailed tutorial but a walk-through of my particular process. The same information is on my web page, emilyoleary.com .
I hook with yarn, rather than with cut strips of wool fabric, which is what many rug hookers use. I can get a looser, more organic distribution of loops with yarn than I could with wool strips, which are hooked in neat lines.
Mostly I use wool yarn. In terms of yarn weight, I can use DK, worsted, or Aran. If I'm using thicker yarn, I leave more holes un-hooked; if I'm using finer yarn, I hook more densely or double up lengths of it. I particularly like using single ply yarns (like Brown Sheep Lamb's Pride or Malabrigo Worsted). I don't keep count, but I think I usually use around two dozen types and colors of yarn per dog.
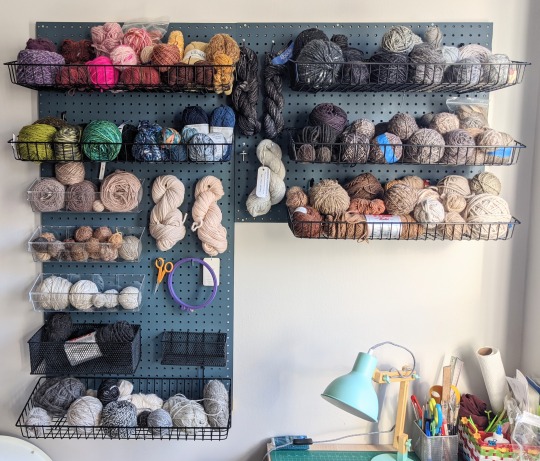
This is my yarn wall in my apartment. Mostly brown and gray yarn!
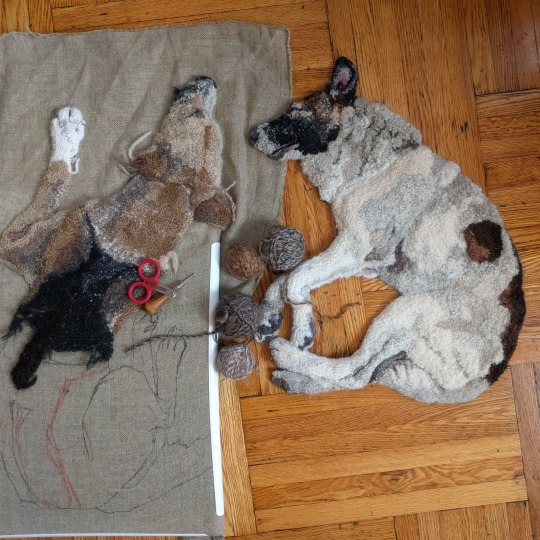
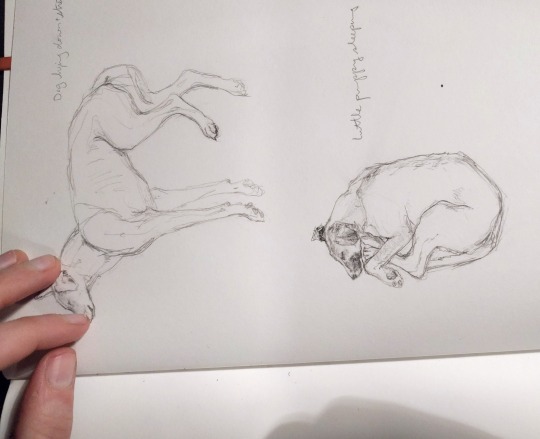
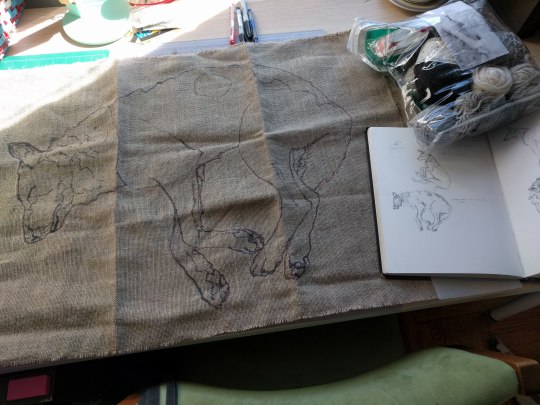
I start from a small drawing in my sketchbook, then I head to FedEx office to use a copy machine, blowing up the drawing repeatedly and experimenting with how big the dog rug should be.
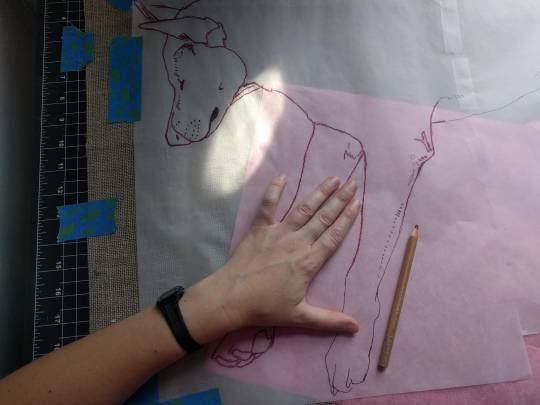
After transferring the image onto my linen, I immediately go over it with Sharpie, because the Saral is really difficult to see and really easy to rub off.
The rug is held taut by a PVC quilting frame that I set on my lap.
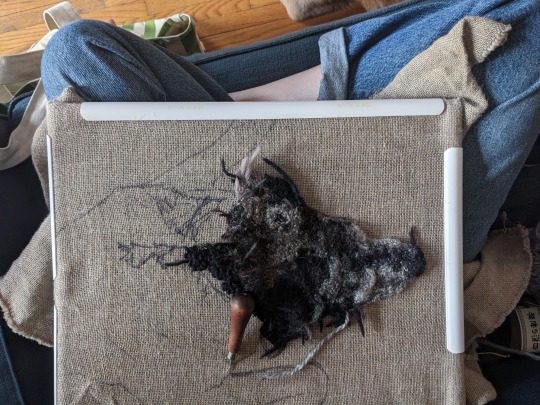
I push my hook down through the fabric with my right hand and my left hand stays below the fabric and guides the yarn while I pull it up and through with the hook. Not every hole in the fabric is hooked. Hooking every hole would make the rug too dense. I do hook pretty densely, though-- If you pick up one of my rugs you’ll see they have a slight curl to them, which is because they’re hooked pretty tight. I'm using all different weights and types of yarn, so it's a challenge to keep the overall tension even.
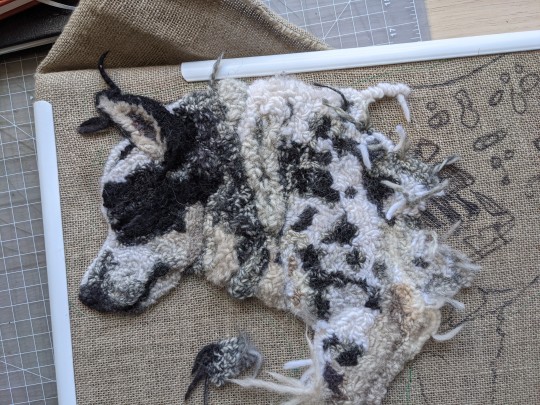
I hook my loops at varying heights to create a very low relief. Sometimes I trim the loops to make them fluffier or wispier or to shape a particular part. I look at a reference photo while I work and pull out and redo sections a lot.
My q-snap frame can accommodate the growing dog rug. I have extenders to make it bigger and I can clamp around my hooking.
The back of a rug looks like lines of little stitches. The lines are little worm trails snaking around because lines of hooking are not supposed to cross over each other. It's important to start a new length of yarn rather than cross over a stitch you already made! I read this when I first started and took it to heart. It makes it much easier to undo and redo hooking if you have to (and I redo sections A Lot). It also keeps the back from getting too bulky and resulting in uneven wear on the back of a functional rug that gets floor use.
When I’m done hooking everything I turn the rug over and brush watered-down Sobo glue on the edges of the dog, making sure to get one or two of the outermost lines of hooking. I do a couple coats of this thinned out glue. I'm careful not to use so much that it seeps to the front of the rug. When the glue is dry I cut the rug out, but I don't cut so close that the loops don't have any linen to keep them in.

It generally takes me at least several months to finish one dog rug. My hooking frame and yarn bag are very portable (though bulky) so I can hook out and about at coffee shops or the library or a brewery if there's enough space and light.
Hooking in the wild makes me an ambassador for making things in general and rug hooking in particular. I answer people's questions and always emphasize how relatively easy it is to get started hooking. Sometimes I get anxious that other people will hook rugs that look like mine but better, but I think that working in a traditional medium means you should share your knowledge for the good of the craft.
9K notes
·
View notes
Text
youtube
i love the crochet girlies that make free patterns esp video tutorials i cant wait to make mini moo dengs for my friends
#SORRY IM STILL OBSESSED#I need to get worsted weight grey yarn i have pink i can use already#she has a lot of good patterns and tutorials#crochet#Youtube
327 notes
·
View notes
Text

Lizard hair clip crochet pattern pdf
#crochet#crocheting#pattern#yarn crafts#amigurumi#craft#fiber crafts#knitting#yarnblr#handmade#tutorial
74 notes
·
View notes
Text
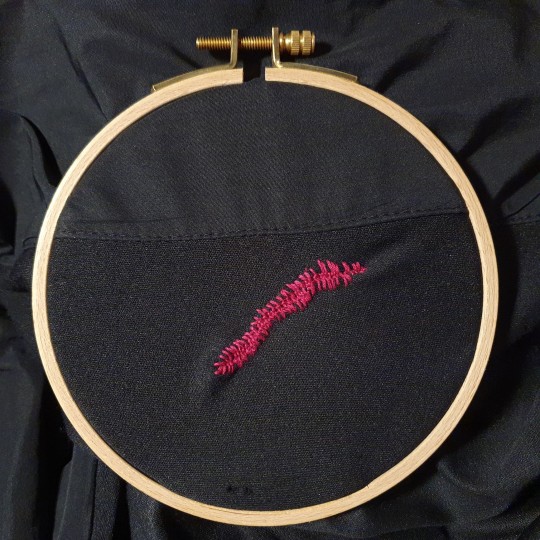
How I mended a hole in knit fabric!
I patched yet another big hole in my reckless partner's sportswear and decided to document how I did it! I used an embroidery frame to help keep the fabric in place, but it can be done just as well without one. Other supplies are just a needle and some yarn. Here I'm using three strand embroidery floss.

I start by securing the fraying edge. Just stitching around the egde, all around the hole! If the edge is not straight, the parts sticking out will fold a bit when you tighten the stitch, but that's fine.
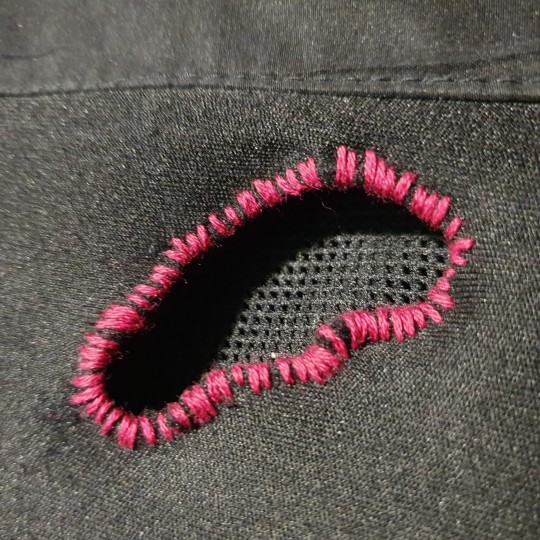
Here is the first step finished. Next, I stitch the two edges together!


There are a few different ways to do it, but the idea is to use the stitches around the edge to pull the two sides together with a ladder stitch. (This means that there's no tension on the fraying edge, just around it on the intact fabric!) I put the needle through two stitches on one side, then two on the other side and so on, always taking either the next two stitches or one previous and one new. Pull tight!
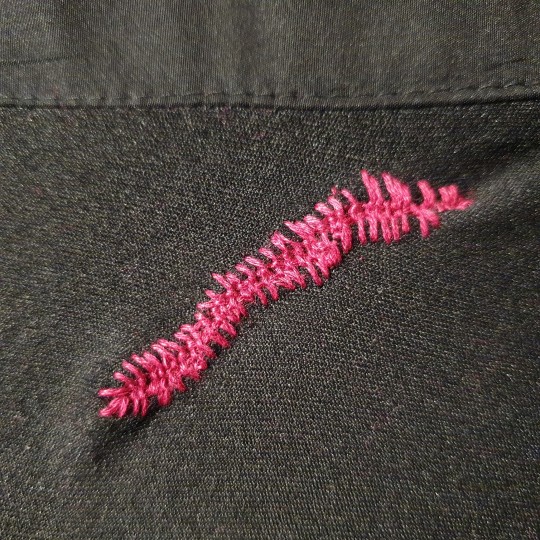
And voilà, the tear is fixed!
And here's another example with matching colours and finer thread.

#mending#visible mending#embroidery#craftsofsiri#tutorial#fiber arts#yarn crafts#solarpunk#solarpunk crafts
610 notes
·
View notes
Text
youtube
The long awaited double knitted twisted rib bind off method is finally here! Big shout out to the genius in my fibre community who developed this method for me and graciously allowed it to be shared. Happy knitting!
#craft#crafts#wip#maker#knit#knitting#knitting tutorial#tutorial#bind off method#knit bind off#double knitting bind off#twisted rib speciality bind off#Luck bind off method#bind off twisted rib#double knit#double knitting#double knitting tutorial#hand knit#knitting methods#knitting yarn#knitspiration#hand knitted#knitblr#knitters of tumblr#knit tutorial#Youtube
86 notes
·
View notes
Text


New video tutorial up on my YouTube channel on my First Crush Slouchy Hat! Find me on youtube @crochetmelovely! Like and subscribe! 💕😊✨️
This was supposed to be my May bonus monthly vid, but time got away from me 😅
youtube
Check out this playlist featuring more crochet Hat tutorials here!
#yarn#video#crochetvideos#crochet#crocheting#videos#crochetersofinstagram#instamood#tutorial#viral#crochetlove#crochetstitch#crochetstitches#crochetaddicted#designer#beautiful#love#youtubevideo#youtube#youtuber#instagood#youtubers#subscribe#followme#instagram#youtubechannel#create#crochetyoutube#handmade#Youtube
36 notes
·
View notes
Text
PLARN (Plastic Bag Yarn) TUTORIAL!
You Will Need:
Plastic grocery bags (though you can also use plastic packaging if it didn’t contain food, or really just any plastic if it’s long enough and clean.)
Scissors
Pen that can mark the plastic
Something to measure with
I’m not the best at describing things, so I’m going to do my best to supplement with images. I would put alt text but I don’t honestly know how to meaningfully describe the images that’s not what I write in the tutorial. Also don’t mind my dirty desk!
Instructions!
Grab your bag! I’m using this blue one because I thought it would show up better on camera and I have a bunch.

Flatten it out, like so! I like to hook one thumb in the bottom flap thing, where it’s sealed shut, and the other in the handle.

Fold it up! I fold it in half, twice, hot dog style. Should get you a nice long rectangle. Make sure the edges are nice and lined up, especially the bottom and the handles.

Chop off the sealed bottom as close as you can to the seam, and the handles as straight as possible. You want nice square corners. You’ve basically got a cylinder of plastic, now.

Unfold one side. It should have only one layer of plastic. If it has more, refold it up and flip it over, and unfold it again.

Measure and mark the width you want your plarn to be! I use an old staples box for the perfect width for my use, but you might want it thinner or thicker depending on. Too thin might cause issues with stretching while working, though.

Cut off any excess. This is where I’m discarding the damaged part!

Mark the top edge, staggered from the bottom marks. Exactly half way! This will be a guideline later.

Cut the marks on the folded side. DO NOT CUT ALL THE WAY ACROSS! Only cut the folded parts, into strips.

Unfold it! Everything should be attached on one side only. It’s time to Spiralize This Bitch.
Cut on a diagonal where one cut ends and the next begins. Hopefully that makes sense? You’re trying to take this tube and make it into a long spiral.

Ta da! You have 1 bag worth of plarn! Tie any subsequent strips together, and have fun working with your plarn!
PRO TIP: this is pretty labor-intensive but I’ve been reinforcing the plarn by single-crocheting the whole length of it, weaving tied ends in as you go. It’s worth it, because I’m making a granny square tote bag out of this, and I don’t want it to break when I’m done.
#keruucrafts#diy craft#diy tutorial#diy projects#crochet#knitblr#yarn crafts#yarnblr#crochet yarn#yarn#zero waste#low waste#zero waste craft#zero waste diy#reduce reuse recycle#solarpunk#solarpunk diy#creative reuse#reuse#recycle reuse renew rethink
53 notes
·
View notes
Text
Creative Idea: Knitting with Scrap Yarn
A few days ago I discovered a video by the channel 10rowsaday, teaching us an innovative way to use our scrap yarn to make something interesting:
youtube
I can see using this knitted fabric to make all kinds of creatures, as well as crazy hair for dolls.
And keep in mind, it doesn't have to be scrap yarn, there's no shame in dedicating fresh material to the creation of something amazing (just be sure to watch the video first, so you can cut the right length)
#crafting#yarn#yarn crafts#amigurumi#tutorial#pattern#patterns#video#youtube#free pattern#helpful#Youtube
36 notes
·
View notes
Text
⚠️🌟Plarn Tutorial🌟⚠️
Ok the class I'm in is so underwhelmingly boring that imma Tutorial all yall!
This one goes especially to: @nightblackowlbat

you got your plastic bag with your groceries. (I can't forbid anything but I FORBID YOU TO SPEND MONEY ON THIS. seriously)

2. cut the bottom off. (i'm non native english speaker so my terms might be sus lol please call me out about it)

3. cut the handles too but don't take them off yet (if you want. it works for me like this)

4. start folding vertically, as straight as you can! if it's rugged within, when you cut the bag the stripes will be all spiky and will get cut under no pressure at all.

5. fold as much as you like keeping the plastic straight, I fold until I can cut in one or two scissor motions max. but don't cut yet! we have one more fold to make.

6. so you folded vertically until thin and straight (like your mom whaaat? ok you can block me now), then give the whole thing one horizontal fold.

7. now, proceed to cut the irregular ends together! the cut handles and the cut bottom. (you can do it separately of course, but our most precious resource -besides the plastic- is our time and our tendons. so save whatever you can and be efficient) discard handles and bottom. you can keep the cut bottom if it's regular enough, usually I discard it (keep it accumulatively along with the handles until I figure out what to do with my many little useless pieces of plastic or, yk, toss it) because it's quite irregular from my first cut.

8. keep cutting, maintaining your preferred width. this width (a couple centimeters) is good for embroidering, the crochet is suuuuuper thin and fragile. haven't knitted anything yet but I imagine it will be just like crocheting in terms of texture.

9. you finished cutting up and now you have many circular stripes. you can roll them wherever you want, I have these little carton cylinders that I get from work (my coworkers keep them for me and it's great!) and they work fine. in the beginning, I cut up little carton rectangles to roll the plarn but it looked ugly tbh. note: you have the circular stripe right? you grab it and stretch it (please don't pull lol) and work it like it's a two fiber thread. not two separate fibers. does i make any sense? if not, there are some clips online about it hehe

10. now the magic happens. this is difficult to put into english words, to be perfectly candid. but you... link the stripes together.

11. you... keep linking. right?? like in a untied knot. idk. in a loop.

12. now, you softly pull. when you work the plarn, you'll get used to the plastic's resistence and will know how much strength you must apply to pull on the fiber without stretching and cutting it accidentally.

13. pull! (softly) pull!!!

14. aaannd you made your first thread of plarn. whoops the pic got turned upside down

15. so now you start headbanging and keep rollin' rollin' rollin' rollin'

16. and there you go!! YOUR FIRST PLARN ROLL!!!! what are you gonna do with it? I wanna see so bad!!!😁
My class is over (and the tutorial as well). I didn't learn anything but I hope you guys did!
Share the knowledge and plarn away!!!🪡🌤️
#biomorbosis plarn#plarn#environmental#sustainability#sustainable art#plastic yarn#solarpunk#diy#diy craft#upcycling#cross stitch#needlework#embroidery#hand stitching#needlepoint#needlecraft#biomorbosis makes#plarn tutorial#plarn diy#biomorbosis tutorial#ecofriendly diy
36 notes
·
View notes
Text
Once again, the genius of the TECHKnitting blog continues to amaze me!
This double-knitting cast on is genius - it keeps your double-knit project (the technique, not the yarn-weight! 😂 from flaring at the cast on edge!
Plus, it answers why double-knit fabric doesn't flop open! (Answer: that pesky curl of stocking stitch fabric is actually working in our knitterly favour - I learned a thing today!)
18 notes
·
View notes
Text

Look at this weird little bitch I made. He’s a crocheted rucksack named Jorgé and he exclusively eats horse meat.
Just thought y’all needed to see
#diy or die#punk diy#punk rock#diy tutorial#diy craft#diy ideas#diy#crochet diy#diy projects#diy punk#crochet#yarn crafts#yarn#yarnblr#goblincore#goblin girl
148 notes
·
View notes
Text

Crochet Your Own Flamingo!🦩 If you haven’t seen it yet, I have a free YouTube tutorial showing you how to make this cute amigurumi flamingo! Why not grab your hook and give it a try. The full tutorial is available on my YouTube channel. What color would you make your flamingo?
#crochet#craft#handmade#amigurumi#plush#yarn#cute#kawaii#crochet pattern#plushie#youtube tutorial#tutorial#flamingo#mevvsan#crochetblr#crocheters of tumblr#crochet project#crochet patterns#yarn crafts#fiber crafts#crocheting
28 notes
·
View notes
Text

Crochet Roses Flower Bouquet Blanket
Follow this beginner-friendly, slow, detailed, step-by-step tutorial to make your own blanket!
HopefulTurns@YouTube
#crochetpattern #hopefulturns
#hopefulturns#hopeful turns#crochet for beginners#crochet#crochets#crochet pattern#crocheting#crochet tutorial#handmade#crochê#bolsa de crochê#bolsa de ganchillo#free pattern#crochet free pattern#youtube#creative#how to crochet#easy crochet#crafts#yarn crafts#crochet project#crochet bouquet#bouquet blanket#diy craft#diy#crochet diy
15 notes
·
View notes
Text


Check out this free pattern from me: Ritzy Ripple Blanket! Full pattern on my blog or download the PDF pattern from my Ravelry shop or Ribblr shop 👋💫💞
Check out this playlist featuring more blanket tutorials here!
#yarn#fiberart#crochet365#crochet#crocheting#crocheted#crochetersofinstagram#crochetblanket#patterns#tutorials#crocheteveryday#crocheter#crochetaddict#crochetallthethings#crochetaddicted#crochetdesigner#crochet_feature_page#crochetblogger#crochetvideo#youtube#youtuber#crochetonyoutube#crochettutorial#crochetpattern#freecrochetpattern#freecrochetpatterns#diy#howto#craft#handmade
37 notes
·
View notes
Text

My mother and grandmother, may not have had the opportunity to receive formal educations, but they were both rich in talent, determination, and heart. They were both very creative and for the most part they were self-taught in the art of sewing, knitting, crocheting, crafting, and baking. My grandmother preferred to be sewing and made me pretty dresses. Mom preferred to be knitting and made me some beautiful sweaters. Both made the most amazing pies! Now for me. I can knit adequately, I can crochet badly so like my grandmother, I prefer to sew but am the only one in my family to make quilts. And I can occasionally make an adequate pie but nothing like them. Lastly, is our daughter. She has sewn but doesn’t like to do it. She hasn’t learned to crochet (yet) but she knits! So, it seams that the sewing & knitting jeans skip generations.
Do you have crafting jeans in your family?
#crafts#gifts#decor#sewing#quilting#briar rose quilts#bedding#shopping#quilters of tumblr#holiday#art quilt#quilting as art#quilt pattern#quilt tutorial#fabric art#quiltblr#embroidery#textile art#fiber arts#quilt#quilts#textiles#family#family jeans#family traits#knitting#crochet#knitters of tumblr#yarn crafts#fiber crafts
15 notes
·
View notes
Text


💗Amigurumi crochet Pink Monster💗
Level: Intermediate
Process: SUPER FUN🎀✨
👇
💗More cute patterns on my Etsy💗
#crochet#cute#kawaii#handmade#crocheters of tumblr#crochetting#diy projects#crochet yarn#creative inspiration#hand made#crochet pattern#diy ideas#diy#inspiration#crochet decor#cute decor#monster#lilo and stitch#pink aesthetic#pinkcore#cozycore#cozy vibes#handcrafted#pattern#tutorial#crochet toys#crochet animals#yarn crafts#toys#toycore
14 notes
·
View notes